$0.00


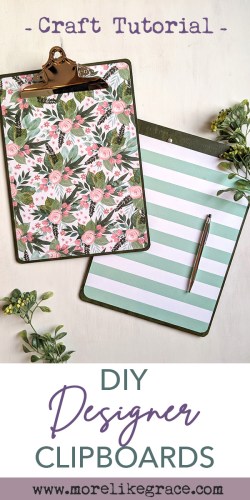
DIY Designer Clipboards

It’s January, and we all know what that means: All things organization start to take over the store aisles and television commercials. With the busyness of the holidays behind, I often embrace this “organization craze” that seems to take over my body at this time of year. There’s just something deeply satisfying about looking upon newly organized drawers or an uncluttered desktop, isn’t there?
The practical benefit of all these organizing efforts is that I can easily find notes and supplies when I need them. But there’s also a completely frivolous reason I enjoy decluttering my desktop: Cute office supplies! Once the papers get filed and random items get packed away where they belong, I can once again notice those cute folders in my desktop organizer and the pretty cover of my planner adorning my desk with flowers.
We’ll have to see how long this lasts!
But for today, I’m enjoying these pretty office supplies, and sharing a fun little DIY clipboard project that you can use to add a touch of charm to your own home office space. Using mod podge, acrylic paint, and some pretty scrapbook papers, I took some basic clipboards I found online and punched them up with designer style.
The end product was a pretty, embellished clipboard that would look perfect taking center stage on any desk! Or you could tuck in a lovely print under that clip and turn it into a creative piece of wall art! (Check out our shop for some gorgeous and inexpensive printable that would work perfectly for this idea!)
You could even craft up a few extras and use them as a sweet, homemade gift idea for birthdays, Mother’s Day, Christmas, etc. (I made several that got tucked into little love gifts for family last month!) And with the huge array of papers that are available these days, this could be a fun project for kids too!
If you’d like to try this DIY Clipboard project yourself, I’ve got you covered with easy instructions and pictures below. So grab some pretty papers and get craftin’! (As soon as you finish that cleaning and organizing, of course!)
Supplies Needed

Supplies for Scrapbook Paper Clipboard Project
- clipboard (I tried with two different clip shapes and found this kind to be the easiest to work with, but this shape works great too–it’s just a bit trickier to cut around.)
- 12×12″ scrapbook paper – two patterns (for front and back) I found mine at Hobby Lobby

- acrylic paint (I used Folk Art olive green)
- small paintbrush
- Mod-Podge
- foam brush
- scissors
- pencil and blank sheet of paper
How to Make
Step 1: Paint
Paint outside edges of clipboard using acrylic paint. *Remember to protect your work surface.* I used some cardboard to protect my work surface and painted about 1 inch, all the way around the clipboard on both the front and back sides.

Step 2: Cut Paper
Trim your paper to a length and width 0.5″ smaller than the overall dimension of your clipboard. (Ex. My clipboards measured about 9″ x 12.5,”so I trimmed 3.5″ inches off one edge of my 12×12 sheet to create 8.5″ x 12″ sheets)

Step 3: Create Template
Using a blank sheet of paper and a pencil, create a template that outlines the edges of the clip section and the rounded corners of your clipboard. (This is a little finicky, especially for the type of clipboard I show pictured here. To make this step a bit easier, use this kind of clipboard instead.)
To make my corners, I lined up the edges of my paper with the edges of the clipboard and traced the corner shape for each side. For the clip section, I measured the distance from the edges to the center and marked my sheet, and then I eyeballed the shape around the clip as best I could.

Step 4: Trace Template Shape onto Your Scrapbook Papers
Now you can use your template to trace the clipboard shape onto your papers, using a pencil. For your FRONT paper, trace the rounded corners on each corner AND trace the clip shape on the top of your paper as well. For your BACK paper, trace the corners only.

For FRONT side, trace both corners AND the notched section.

On BACK side, trace only the corners: NOT the notch.
Step 5: Trim Your Papers
Use a scissors to trim away the corners and the notched section that you marked on your scrapbook papers. You should end up with a FRONT paper that has rounded corners and a clip notch, and a BACK paper with rounded corners.

Step 6: Apply Mod Podge to Front of Clipboard
Using a foam brush, apply the mod podge evenly over the surface of the clipboard, working quickly so it doesn’t start to dry.

Step 7: Apply Paper to Front of Clipboard
Place your paper onto the Mod-Podged surface, centering it so there’s an even edge around the outside. Once you have your paper centered, begin smoothing out any air bubbles. I found it helpful to use a ruler to push along the surface of the clipboard: I started at the top center, and pushed the air out and down with the ruler as I went.
 Step 8: Repeat Mod Podge and Paper Application on Back Side
Apply Mod Podge and paper to back of clipboard, using the same techniques described in Steps 6 and 7 above. Note: I placed my paper directly under the little silver screws from the clip, so I had a little wider border on the top than on the bottom of my back side.
(You can see the placement of my back/striped paper in the image to the right.)
Step 9 (Optional): Add Protectant Mod-Podge Layer
I planned on adding another layer of mod-podge to all my clipboards, so that they could be more easily cleaned if necessary. As I added the Mod-Podge on top of the first clipboard, my paper began to bubble again, and I had to go through a careful smoothing process all over again. In the end, it did dry up just fine, with a bit of a glossy shine over the paper. But it seemed like a lot of hassle, and I preferred the look of my “flat” finish papers with no extra mod-podge on top: so I didn’t bother with the Mod-Podge extra layer on the rest of my clipboards.
It’s really up to you if you’d like to add the extra protection or not. (If you’re planning to use as a wall decor piece, with a pretty print tucked under the clip, I’d definitely skip this step.)
And that’s it! Now you have a pretty new clipboard to use or share with someone you love. Hope you enjoyed this fun, little craft.
