$0.00


DIY Embroidery Hoop Christmas Ornaments

Well friends, it won’t be long now. In a few short weeks, I’ll haul the Christmas tree out of storage and huff and puff my way through pulling it upstairs to our living room. Next will follow the annual ritual of testing lights, muttering about their poor manufacturing quality as I attempt to replace burnt-out bulbs, and then ultimately giving up and heading to the store to buy a new strand or two. And after that expedition will come the ridiculous efforts of trying to shift and shape the branches of our artificial tree to make them look–well–a little less artificial.
 (I know. I know. We should just buy a real tree . . . but I’ve heard they come with their own variety of yuletide frustration.)
Despite the fact that setting up the Christmas tree can be such a fiasco, I treasure the end result: An evening of tree decorating with my husband and kids. I love sorting through all the ornaments and the exclamations of joy and shared memories as we hand them out to the kids.
We laugh about the large quantity of locomotive ornaments given to my son during his younger, train-obsessed years. We admire the tiny, sparkly ballet slipper ornament given to my daughter the year she took her first dance class. And we always enjoy sifting through the contents of a box I inherited from my mom several years ago: It’s filled with colorful ornaments from my own childhood days.
I’m sure it will come as no surprise to anyone that several of the ornaments that adorn our tree were crafted by my own two hands. There’s something especially sweet about pulling them out of the box and hanging a tiny bit of my creative inspiration on the tree.
So as I approach my first holiday season as a blogger, it was easy to decide what special Christmas tradition I’d like to start here on the blog: A Christmas ornament craft!
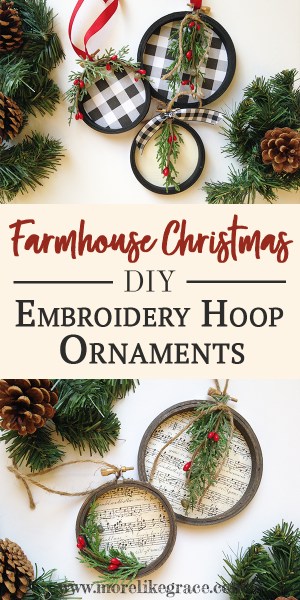
I headed to the craft store with a few vague notions in my head–I wanted to use embroidery hoops and I wanted to make something with a farmhouse feel. An hour later, I returned home with sprigs of greenery, a couple scrapbook papers, and a plan. I pulled out some paint and stain from my supply stash at home, started heating the glue gun, and got to work.
The end result was five cute ornaments with lots of farmhouse charm. Three of them feature buffalo-check plaid that adds such sweet farmhouse charm. And the other two reflect my love for piano-playing, featuring musical notes, greens, and a rustic touch of twine. As I finished up tying the ribbons around the clasp of each embroidery hoop, I smiled and imagined them hanging on our tree.
If you’d like to craft a few of these ornaments for your own tree this year, you can check out the instructions below. It really is a simple craft, although you’ll need a bit of extra time to allow for paint/stain drying before you assemble the rest of the ornament. After the paint had dried, I finished up all five ornaments in just a half hour’s time.
So grab some cocoa, put on some Christmas music, and get ready to add a bit of farmhouse charm to your Christmas tree this year. Or maybe you can make a whole batch to give away as a love gift to family and friends. I hope you’ll feel inspired to give one (or more) of these ornaments a try!
Supplies Needed:
- embroidery hoops (3″ or 4″)
- black paint, or dark brown stain
- paintbrush or rag
- scrapbook papers in plaid or music print
- ribbon and/or twine
- holiday greenery
- scissors
- glue stick
- hot glue gun

How to Make:
Step 1: Loosen the embroidery hoop clasp and separate into two sections. Paint and/or stain the embroidery hoops. I painted all front sides and the inner rings. Leave to dry. (This might be a good time to grab a Christmas cookie. Just sayin.’)


Step 2: Using a pencil, trace the outline of your embroidery hoop on the back side of your scrapbook paper. (Male sure you use the larger part of the hoop, the one with the clasp at top).

Step 3: Cut the circles out of your scrapbook paper using a scissors.

Step 4: Place the two parts of your embroidery hoop back together and tighten the clasp so they stay securely together. Apply glue to the back side of your embroidery hoop.

Step 5: With your scrapbook paper flat on your work surface, with the pattern-side facing UP, set your embroidery hoops in place and press down so the glue will stick to the paper. (It’s important to see your paper pattern while gluing to the embroidery hoop so that you can center the design as needed.)

Step 6: Cut small sprigs of greenery and arrange together in small clumps. Hot glue pieces together if necessary. (For a couple of my ornaments I tied the little arrangement together with a bit of twine. For the others, I used hot glue in strategic places to hold the berries and greens together.)

Step 7: Place a line of hot glue on your embroidery hoop, where you want to attach the greens. Quickly press greens in place as glue cools.

Step 8: Cut a length of ribbon or twine approx. 12″ long.

Step 9: String the ribbon through the small clasp of the embroidery hoop.

Step 10: Tie the ribbon together at the ends, and you are all set to hang your pretty new ornament on the tree!

Whether you make them for yourself, or as a sweet little gift for a friend, I hope you have fun crafting these ornaments. Drop me a comment below and let me know how it goes. I’d love to hear from you. Merry Christmas Friends!


[…] Hoops are all the DIY rage this season (like this cute Chalk Embroidery Ornaments or DIY Embroidery Hoop Ornaments) and I thought it would be fun to try my hand at creating a Christmas Embroidery Craft for myself. […]
Adorable, just adorable!
Thank you so detail step by step how to make, I loved it ,many Blessings to you , Happy holidays
I love this project. So simple and so inexpensive. I am going to try these for sure.
I would love to be in your friend group.I just found you today and plan on making your embroidery hoop ornament.😀
I hope your ornaments turn out great for you! 🙂
[…] Embroidery Hoop Ornaments […]
[…] Source: morelikegrace.com […]
Each year I host a Christmas Craft party for a few of my retired teacher friends. This year I plan to have them make your embroidery hoop ornaments as one of the crafts. Thanks for the clever idea.
Crafting with friends is the best way to craft! Hope you have a great time with your project. 🙂
[…] year, I posted some cute embroidery hoop ornaments on the blog, and I thought it’d be fun to offer another simple Christmas ornament craft this […]
[…] homestead-acresForm morelikegraceFrom […]
[…] Embroidery Hoops Christmas Ornaments […]
I wanted to let you know I loved your idea! I included it in my post “40+ Christmas Countdown Activities Jar {free printable}”. If you would like me to include an image- to encourage viewers to click through and pick this one out of the options I listed- you can leave a comment on the blog post: https://www.thehousewifemodern.com/blog/christmas-coundown-activities/ or e-mail me at [email protected].
Thanks! This was a beautiful idea and I hope my readers like it.
[…] going to list them here. Pick one and make sure you have the items prepped for it. – DIY Embroidery Hoop Christmas Ornaments– Snowflake Gold Glitter DIY Ornaments– Snow Owl Ornaments– Various Colored Paper […]
[…] Source: More Like Grace […]
[…] Get The DIY Instructions On More Like Grace […]
[…] Source details: morelikegrace.com […]
[…] Learn How To Make It On morelikegrace […]
[…] DIY Embroidery Hoop Christmas Ornaments […]
[…] 18. DIY Embroidery Hoop Christmas Ornaments […]
[…] GET TUTORIAL HERE […]
[…] GET TUTORIAL HERE […]